
We finished a project this week that, on the face of it, seemed like it would be rather straightforward. However, it proved to be rather complex, and required the help of several people (Pat Powers, Henry Powers, Travis Cleveland, a Home Depot clerk in the tile department, the guy at True Value, and Renee and Ron!).
When we bought this house, we didn’t realize that the shower in the second bathroom was more than non-functional, which is what the home inspector implied. In actuality, plumbing for the shower was non-existent, and a poorly placed shelving unit jutted over the tub. Everyone who looked at the shelving unit (shown in the photo below, note that the left side of the shelf is about a foot into the shower space) wondered aloud what whoever did it was thinking!

Our choices were to rip everything out and put plumbing in the wall to install a traditional showerhead (very expensive, even though the wall was already plumbed for water), or put a shower extension on the existing faucet. We picked the latter since we thought it would be less work (and definitely less expensive).
It was not as easy as we hoped for numerous reasons. The main issue was that the shelving was in the way of a coherent setup. In addition, there was no bracket with which to hold the showerhead in place; no waterproofing of any sort around the upper parts of the tub enclosure (wallpaper?!?!?!?); and it turned out the faucet didn’t work that well. So, here’s what we did, starting in late June, and 🎺trumpets🎺, finishing this week!
Step 1
Angie’s parents pulled out the very snugly installed shelving. This was an all-day project and by the end of it they were completely worn out.
 Step 2
We bought a shower head with a slide bar on which to hang it. We couldn’t find one at the local hardware stores (where the staff had a hard time understanding the concept of a shower hose that attached to the tub spout) so we resorted to Amazon.
Step 3
When we attached the shower hose to the spout, water just trickled out. At first we were concerned that the valve was damaged or clogged, since we knew water could flow easily out of the spout itself. In the end, Angie and her dad went to Home Depot and replaced the tub spout with one that would actually enable water to come out of the showerhead in such a way that a person could take a satisfying shower (Angie, Pat, Henry).
Step 4
Angie and Henry installed drywall in the gap where the cabinet had been and mudded it in place.
 Step 5
Angie came up with a creative tiling pattern to account for the fact that we couldn’t find the old tiles to purchase anywhere. (Or tiles of the same size at all!) We then installed tile to cover the lower part of the space that had been drywalled (Pat, with a little help from Maureen). This also involved purchasing tiles from three different places (Lowes, Home Depot, Habitat for Humanity ReStore)!
 Step 6
Angie’s parents went home to Ohio, hoping that when they come back there will be no more projects that involve a day of strenuous labor trying to figure out how something is attached to the wall (come back soon, we miss you!).
Step 7
I stripped the wallpaper, including a border that was already peeling off the wall, while Angie was out of town.
Step 8
Angie and I painted the bathroom, including the ceiling, which previously looked as though someone had smeared something not very appealing on it.
 Step 9
After getting a clerk at Home Depot to cut one of the tiles we’d removed from around the cabinet down to a 2×2 (or so) square, I attached it to the wall on the spot where the top of the mounting bracket for the shower head was going, so that both ends of the bracket would be the same distance from the wall. Once it was affixed using tile adhesive, I put sealant around the edges to prevent water from getting in.
 Step 10
The scariest part of the whole project (other than step 14) as well as the most frustrating step: drilling two holes in the wall to affix the mounting bracket to which the slide bar would attach. We were afraid that the tiles might crack while we were drilling through them. We found an appropriate bit and Angie practiced on some tile that had been pulled off the wall when we took the cabinet out. That seemed to go ok, so we proceeded to the bathroom to drill the holes proper. First issue: the bit was worn out. Off to Home Depot or Lowes for a new bit ($10!!!). It then took Angie about 45 minutes to drill the lower hole. She had to stop periodically to rest her arm, let the bit cool, and make sure she was still drilling in a straight line. We also concluded at this point that neither of us had the height/leverage to drill the hole for the upper anchor. Our dear friend Emilie volunteered her partner Travis, and he came in and got it done in about 20 minutes, using water to cool the bit, and his greater upper body strength to barrel through!
And then: ROADBLOCK!!!!
I haven’t mentioned this previously, but the instructions from Kohler for installing the shower head and bracket were, to put it kindly, not well written. It turned out that the directions for the size of hole to drill applied only if you were installing the bracket on a stud. We were not, since the shower head would not have lined up in the middle of the tub had we done so. Therefore, we needed a bigger hole so that we could use anchor screws to secure the bracket adequately! On the upside, we did have a hardened bit of the correct size for this task, and it didn’t take nearly as long to expand the size of the holes as it did to drill the initial holes. Phew for that.
Step 11
Figuring out the best type of anchor screw to use. We had two plastic types that came with the shower head, but we were not convinced (and several of our supporters agreed—thanks Ron, Renee, and Henry) that we should use plastic instead of metal anchors. I had some anchor screws that had never been used that were the sort of thing that we needed, but that were not quite the right size. We needed the section that didn’t collapse against the inside of the wall to be long enough to go through tile and drywall, not just drywall, which was the size I had. Off to True Value on the south side went I, since it’s well known around town that if you need anything a tiny bit different, that is the place to go. Mission accomplished!


Step 12
Installing the anchor screws. I separated this step from 11 because Angie and I were both a bit nervous about doing this task, since neither of us had done it before and we didn’t quite know the mechanics. We checked a couple of videos on YouTube and it proved to be fairly straightforward. The anchors we had bought have little metal clips on them to secure them to drywall so they don’t spin as you’re installing them. However we had tile on the front side, so Angie used some pliers to flatten these (as recommended on one of the videos we watched), since we didn’t want them to crack the tile. Then, it was as easy as pushing the anchors into the drilled holes, and then screwing the screws as though we were tightening them to get the anchors to engage on the inside of the wall (while also making sure they just didn’t spin around endlessly!)
 Step 13
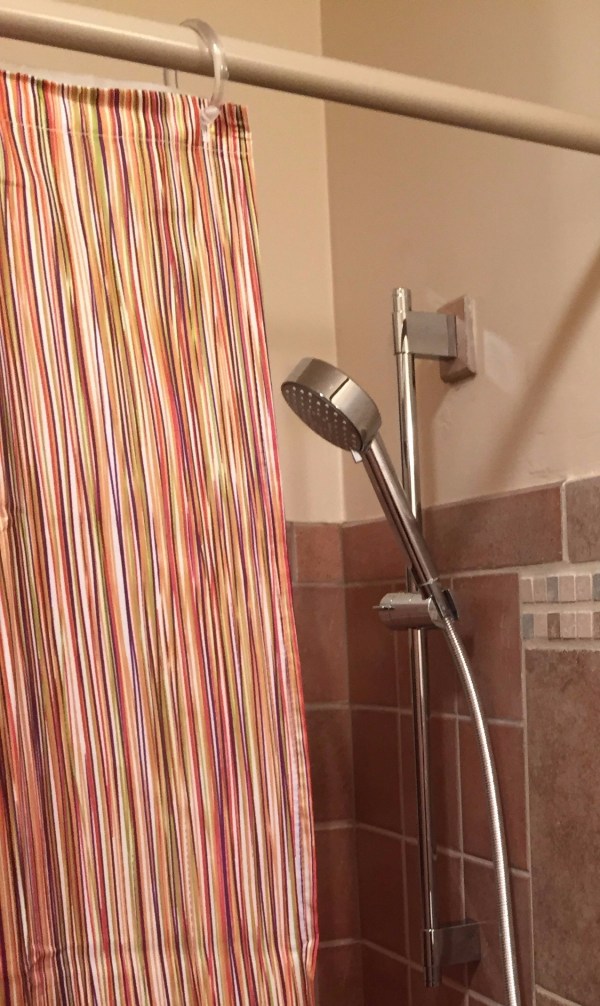
I feel like I can collapse these last little bits into one step, since they proved to be some of the easiest tasks we did: Two mounting blocks were attached to the anchor holes, and then, after applying sealant and letting it dry overnight (because why not), we adjusted the mounting bracket for the correct length and attached it to the mounting blocks using the set screws that came with the bracket and shower head. SUCCESS. The almost final pieces of the project were of course hanging the shower curtain rod and the shower curtain.

Step 14
Truly the scariest moment. Taking the first shower with the new setup to ensure that it would be a decent experience for us and our prospective guests. We were concerned that after all this work, the shower would be an unsatisfying experience, but I’m happy to report that it was a delightful shower! Yeah, no pictures of that one….
Now we can not only invite out of town friends, but start offering ourselves as Warmshowers hosts at last!
Here’s a picture of the finished project, shower curtain and all!

Good work!
What a process! Glad you prevailed. Looks great!!!